|
O·M·N·I User's
Manual #3
Setting Up Your
O·M·N·I™ Server Nodes
CONTENTS
 3.1 The O·M·N·I Server The O·M·N·I Server offers a single, flexible interface for setting up your server nodes, monitoring connections, and managing online activity on your system. In addition to providing a simple, user-friendly graphical environment in which to specify your communication settings, it also serves as a "control panel" that enables you to access and manage some of your system's main areas without opening other O·M·N·I components. Local chat—which is what the system administrator uses to monitor and/or chat with other callers connected to the system—is also located in the O·M·N·I Server. Server installation is achieved during normal
installation of your O·M·N·I Online Information System
software. When you start the Server for the very first time, O·M·N·I will automatically detect whether or not your communications have been set up and will instantly prompt you with a pop-up dialog. When you continue, the "O·M·N·I Server Node Setup" dialog will appear on your screen, where you may complete the proper setup for each individual node on your system. (You must set up each node individually.) For each specified node, you have the option of allowing either direct (phone) Dial-up, TCP/IP (Internet), or a Local (test) connection. You also have the option of allowing connections to a specified node through a Custom Front End server, if you choose. [See next section, "Node Setup... and Internet Connections," below for complete instructions.] Once you have completed your node setup (by selecting Done) . . . the "Node List" window will appear on your screen with the specified nodes listed. The Server will now automatically start your nodes whenever you open it, and their status will be displayed in the "Node List" window. 3.1.1 Node Setup... and Internet Connections You may run node setup at any time by clicking the "O·M·N·I Server Node Setup" icon in your O·M·N·I Program Group or by selecting Node Setup... under the Server menu in the O·M·N·I Server. The O·M·N·I Server must be shut down whenever you choose to run node setup. (If it is running, you will be prompted accordingly.) NOTE: For convenience, you may also interrupt the Server "startup" process and go directly to node setup by simply clicking on the Setup button in the lower right corner of the Server startup screen. Communications setup for each individual server node you wish to specify for your online information system is easily performed in the "O·M·N·I Server Node Setup" dialog box [Figure 3-A below]. Allowing Internet connections to your system is also enabled using this dialog.
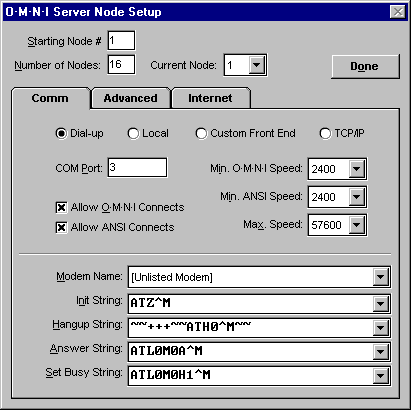 Figure 3-A The "O·M·N·I Server Node Setup" dialog provides a simple, user-friendly graphical interface for setting up each individual server node on your information system. In this example, Node #3 has been selected for the present server node setup, and Dial-up connectivity has been specified with the appropriate settings indicated. If you are setting up a multi-server network, you may specify a different set of (node) numbers for each individual server, with the starting node for each represented by the first number in the sequence. Node numbers are specified at the top of the "O·M·N·I Server Node Setup" dialog and represent values for each of the following: Starting Node #: Starting number specified for first node on current server. Number of Nodes: Total number of nodes specified for current server.
You use this same dialog box for setting up each separate node on your system. To change to a different node during setup, simply set the value inside the Current Node field to the node number you want. You may proceed to specify communication settings for each node—along with various other options—by selecting the appropriate tab and setting parameters as described below (remember, you must specify each node separately): 3.1.1.1 Comm By selecting the Comm tab in the "O·M·N·I Server Node Setup" dialog box, you may set communication parameters for the Current Node, as listed below.
Modem Name: Specific modem model to which current node is connected.
Hangup String: Hangup string for modem on current server node (editable). Answer String: Answer string for modem on current server node (editable). Set Busy String: Busy string for modem on current server node (editable).
3.1.1.2 Advanced This tab section is used for setting advanced options for the currently selected server node. The available options include:
Display A dialog displays initialization codes at startup when this Initialization Process: option is checked. Wait After Initialize: The dialog [above] stays on screen 60 seconds when checked.
3.1.1.3 Internet A unique feature of the O·M·N·I Server is its ability to accept both direct (phone) dial-up and TCP/IP (Internet) connections. Anyone who can log on to the Internet can also log on to your O·M·N·I Windows system using O·M·N·I Term. What this means is that callers anywhere in the world can connect to your O·M·N·I system over the Internet, instead of calling long-distance. This makes it considerably more economical (and realistic) for many users to access your system. The O·M·N·I Server uses the standard Window's WINSOCK.DLL for TCP/IP access. This means that any connection type that is supported by WINSOCK.DLL can be used by O·M·N·I. This includes TCP/IP LANs, dial-up (SLIP/PPP) Internet access, and dedicated Internet connections (ISDN, T1, etc.). You can also map Internet newsgroups to your message boards for access by NNTP [see Section 2.1.4.5—"Newsgroup Options..."—in your Configuration Utility documentation for specific instructions]. All that is necessary to configure a server node for any of the above connections is to check TCP/IP under the Comm tab in the "O·M·N·I Server Node Setup" dialog box for the currently selected node [also see "TCP/IP"—Section 3.1.1.1—above]. You may also specify options under the Internet tab, as described below:
Now, whenever you wish to run the O·M·N·I Server with nodes set for TCP/IP connections, you simply need to make sure your Winsock or "dial-up networking" program is already running and connected to the Internet before you launch it. You must also provide your users with your IP address or domain name, which they may enter into their dialing directory in O·M·N·I Term just as they would any phone number for direct dial-up connections. They must specify the Connection Type as "O·M·N·I • TCP/IP (Internet)" and enter the appropriate address in the IP or Domain Name field in the "Edit Dialing Directory Entry" dialog box. To connect to your system, they may select this entry either from their Dialing Directory or "Sign On" window and simply log on as they normally would—but they must be connected to the Internet when they run O·M·N·I Term. NOTE: Users may connect to the Internet via any major commercial online service which supports access—such as America Online, CompuServe, or Prodigy—as well. But they should be logged on to the service and connected to the Internet before launching O·M·N·I Term to access your system. On a single O·M·N·I Server you may use the same IP or domain name for as many nodes as your computer and connection's bandwidth will handle. For example, a 28.8 baud connection over a standard phone line might handle four callers at once. An ISDN connection at the same speed might handle as many as 20. With a T1 line, you might be able to specify as many as 200 nodes using the same IP or domain name on one O·M·N·I Server. (NOTE: O·M·N·I node upgrade packs are available if, at any time, you wish to increase the node capacity of your system.) Finally, for dial-up Internet (SLIP/PPP) connections it is more practical if the IP address you receive from your Internet provider is the same one specified at all times (sometimes called a fixed or "static" IP). It should not change every time you log off then back on again with your provider—which is sometimes the case if an IP is "server assigned." The obvious reason for this is that it would be very difficult to notify your callers every time your IP changes. Also, with a fixed IP address you can have a domain name like o-m-n-i.com. NOTE: It is oftentimes more practical (or economical!) to have a "full-time dial-up" Internet access account. This is one where you are connected to your provider 24 hours per day. 3.1.1.4 How the Term Pings the Server To safeguard against dropped connections, the Term sends a ping to the server every 30 seconds to let it know it is still active. If the Server does not receive a ping for more than 90 seconds it will disconnect the node. While this is especially useful for dial-up connections (for example, if the Term errors out but doesn't disconnect the user, the Server will) . . . it is also very practical for TCP/IP connections—mainly because if the user's connection to the Internet drops, TCP/IP does not inform the Server (but the Term will!). To accept the present settings for all the server nodes currently specified in your O·M·N·I Server, press Done. The first time you set up your server nodes, the Server will automatically restart. After that, any time you select Node Setup... from the Server menu and shut down the Server to configure your nodes, the following dialog will be displayed on your screen when you press Done.
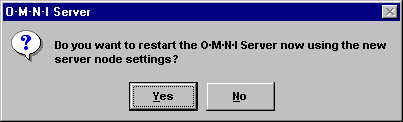 Figure 3-B If you select Yes, the O·M·N·I Server will restart using the new settings. If you select No, the new settings will be be used the next time you run the O·M·N·I Server. 3.1.2 Viewing Initialization, Connect & Caller Information Once your communications parameters are properly set [see Section 3.1.1—"Node Setup... and Internet Connections"—above] your server nodes will initialize automatically and be ready to accept calls as soon as you open the O·M·N·I Server. General connection statistics, as well as more advanced information about each node, are easily and plainly viewed as follows: 3.1.2.1 Node List The "Node List" window, which immediately appears on your main screen when you open the O·M·N·I Server, lists and displays the general status of all the nodes set up on your system. At any time, you may see which nodes are waiting, which are connected, the last action a user performed online, or any errors that might occur—among other general connection statistics. The "Node List" window may be resized—or minimized completely—if you wish to make room on your desktop for conducting other Server operations. 3.1.2.2 Full Node Information More advanced information for each individual node may be accessed by first highlighting the node in the "Node List" window . . . then selecting Full Node Information from the Node menu. (For convenience, you may also right-click on the highlighted node to display the Node menu.) A window will be displayed (named for the selected Node #) which shows a complete activity log of everything that has occurred on the selected node during a connection—including caller's name and user ID, type of terminal currently connected (i.e., O·M·N·I or ANSI), connect string, and time of connection. This activity log will also be automatically written to a .LOG file in your \SERVER subdirectory if "Write Activity Log To File" is checked under the Advanced tab section of your "O·M·N·I Server Node Setup" dialog. (Logged events which were written to the .LOG file when the Full Node Information window was not open will be automatically reloaded in the window when it's opened.) Like the "Node List" window—this window may also be resized or minimized if you wish to make room on your desktop for other Server operations. (Because it is an "optional" viewing tool, it may also be closed completely.) 3.1.2.3 Users Connected/Users Chatting You can view the number of users currently connected to your system at any time by looking at the status box on the left end of your Server toolbar. When no one is connected, the default "No users connected" will be displayed. Similarly, you may view the number of users currently chatting on your system in the same status box. When no one is chatting, the default "No users chatting" will be displayed. 3.1.2.4 Tiling Windows to View All Node Information at Once If you wish to display all node information on your screen at once (i.e., the "Node List" window along with "Full Node Information" for selected nodes), you may conveniently do so by simply selecting Tile Horizontally or Tile Vertically from the Window menu. All open windows will be tiled evenly on your screen, according to your preference. (Select Cascade Windows—the default—if you wish to size and position windows where you want.) NOTE: You'll find that some windows in the Server (the "User Manager" window, for example) have a minimum size and may not tile properly. You can also arrange any minimized window icons in an orderly fashion along the bottom of your screen by simply selecting Arrange Icons from the Window menu. 3.1.2.5 Shutting Down or Restarting a Node At any time, you may shut down an individual node by first highlighting it in the "Node List" window then selecting Shut Down from the Node menu (also accessed by right-clicking the listed node). You'll also notice that — Node # Selected — is also displayed as the first (grayed out) item in the drop-down menu. You then have the option of making your phone line Busy or Not Busy for anyone who calls in to your system and cannot connect to any other nodes (i.e., if they're busy—or in use—also). The reason for these two options is that many system administrators prefer to make their line busy to give callers the impression that the system is still in use. If it is not busy, it will simply continue to ring unanswered. You may restart (i.e., re-initialize) a node at any time by selecting Restart & Initialize Node from the Node menu. You have the option of displaying the initialization process for any node [as described in Section 3.1.2.7 below]. 3.1.2.6 Shutting Down Your Server O·M·N·I was designed with fully integrated and, in many cases, independent operation of most utilities and component programs, so that you can continue to manage and develop different areas of your system without shutting down your server. There are times, however, when you will need to do so—for instance, when you're ready to put new or updated windows online . . . or whenever you use the Database Compact function in the Configuration Utility. You may also need to do so in a system emergency. When you need to shut down your server, you have the option of leaving your phone lines busy on all nodes or simply letting the phone ring, unanswered, on all nodes. You also have the option of performing an emergency "Quick Shutdown." These choices may be found in the Server drop-down menu on your main menu bar . . . and are detailed as follows:
Exit With All Nodes Not Busy: Shuts down server without making all lines busy (i.e., leaves them to ring unanswered). You will be prompted as to whether or not you wish to proceed and hang up any callers that may be connected.
3.1.2.7 Displaying the Initialization Process You may view your modem's initialization process whenever you restart or initialize a server node . . . if you specify "Display Initialization Process" under the Advanced tab of the "O·M·N·I Server Node Setup" dialog box [see Section 3.1.1.2 above]. Then, whenever the node is initialized, the window in Figure 3-C [below] will pop up automatically and remain on the screen until initialization is completed. NOTE: Black text preceded by two left arrows indicates what O·M·N·I is sending to the modem. Blue text preceded by two right arrows indicates what the modem is reporting back to O·M·N·I. If you also specify "Wait After Initialize" (under the Advanced tab), the dialog will remain on your screen until you either close or minimize it.
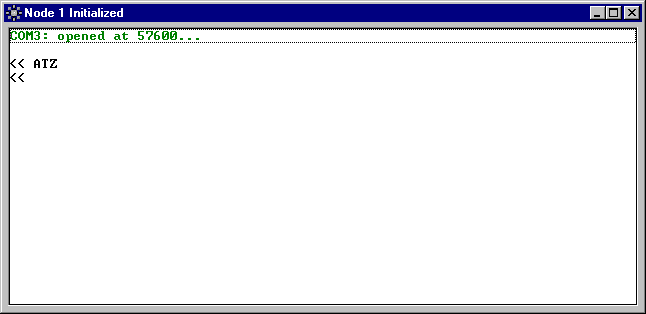 Figure 3-C If you mark Display Initialization Process under the Advanced tab in the "O·M·N·I Server Node Setup" dialog box during node setup [see Section 3.1.1.2], the window pictured above will display the proper strings specified for your modem as it initializes. If you also mark Wait After Initialize, the window will remain on your screen until you either close or minimize it. 3.1.2.8 Statistics
 The "System Statistics" window [Figure 3-D below] provides yet another means of viewing statistics and monitoring online activity from the O·M·N·I Server. It is especially useful for keeping track of system events while you are away from your computer for any length of time. You may access the window by selecting Statistics
+ The first time you open the Server, all statistics in this window will be set to 0 (zero) by default. At any time, you may view the statistics in this window by simply opening it (it may also be minimized); statistics will also continue to be gathered even when the window is closed. You may reset all values to zero at any time by simply selecting Statistics + Reset Statistics from the System menu.
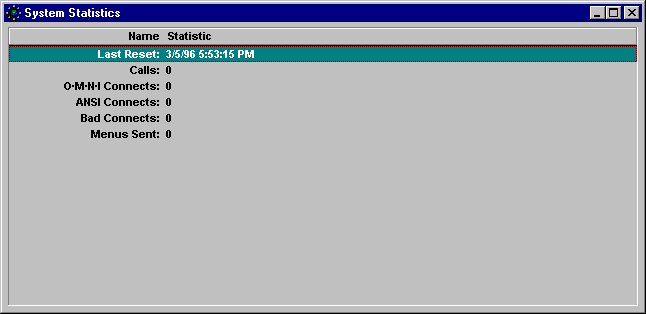 Figure 3-D The "System Statistics" window keeps a full tally of system events when you're away from your computer for any length of time. You may reset the values to zero at any time to start a new record. 3.1.2.9 View User Information You may instantly view user database information about any user currently online by simply highlighting the node they're connected to (in the "Node List" window) then selecting View User Information from the Node menu. This will display the "User Database" dialog [Figure 3-F] with the current user selected, where you may view or edit statistics the same way you do in the "User Database" area of your O·M·N·I Configuration Utility. [See Section 3.2.1.1 below—"Viewing and Editing Statistics for Individual Users"—for a complete description of its use.] 3.1.2.10 Updating a User's Security While Connected You can instantly update a user's security level while they are currently online by simply highlighting the node they're connected to (in the "Node List" window) then selecting View User Information from the Node menu. Their current security level and/or key word(s) in the User Database may then be resent to be instantly updated on your system NOTE: If you are unfamiliar with how to set security levels in O·M·N·I, refer to Section 2.1.3.3—"Specifying User Access & Security"—in your Configuration Utility documentation (O·M·N·I User's Manual #2). 3.1.2.11 Multiple-format File Viewing Utility The O·M·N·I Server features an extremely versatile and easy-to-use file viewing utility which allows you to browse, open, and view files in a number of popular image formats. Text, RTF, sound, and video file formats are also supported—in fact, you can use this utility to open a ZIP file and decompress it for you directly from your Server! To view any file supported by this utility (including .TXT, .RTF, .BMP, .CMP, .JPG, .GIF, .TGA, .PCD, .TIF, .MID, .WAV, .AVI, and .ZIP) . . . simply select Open from the Management menu on the main menu bar, then use the browser to find the file on your system (making sure to also use List Files of Type to select the proper format). To view the file, just double-click on its name—or highlight it and select the Ok. The appropriate "viewer" will instantly appear on your Server screen where you may view (or play) the file. You may also view files in this manner from the O·M·N·I Server's File Area Manager [described in Section 3.2.2.1 below] simply by right-clicking on any file currently selected in your listing. NOTE: This utility is also included in O·M·N·I Term. 3.1.2.12 Messaging Users When Someone Else Signs On or Off If the Send Sign On & Off Messages option under the System menu is checked, notification messages will be sent to all users currently connected to your system whenever another user signs on or off. If it is not checked, no notification will be sent. 3.1.2.13 Enabling/Disabling Accounting System At any time, you have to option of enabling or disabling your accounting system by either checking or unchecking Use Accounting System under the System menu. When checked, the accounting system is used. When unchecked, all your current accounting settings are ignored, and the Server will cease to track or update any of your user accounting plans. 3.1.3 Transferring New Windows & ANSI Menus to the Server The way the O·M·N·I Server utilizes the windows and objects you create in the Window Editor is quite simple: You move (actually copy) them from the Editor to the Server when ready. What this means is that you can continue to edit new or existing windows and objects completely offline—in the Window Editor—without interrupting your O·M·N·I Server . . . so callers will still be able to connect to your service even while you're making changes to it! Similarly, the way the O·M·N·I Server utilizes the menus you create using the ANSI System Editor works exactly the same way (the paths are simply different.) Both methods are described in the sections below: 3.1.3.1 Copying Your Windows to the Server The windows and objects you create (or modify) in the Window Editor are stored, by default, under the \EDITOR\WINDOWS subdirectory. The windows and objects utilized by the O·M·N·I Server are stored under the \SERVER\WINDOWS subdirectory. Before your Server can use any new and/or updated windows and objects, you must first copy them from your \EDITOR\WINDOWS subdirectory directly to your SERVER\WINDOWS subdirectory. Similarly, whenever you specify or make changes to any "Permanent Windows" and/or the "Startup Window" on your system [described in Section 4.3.3 of your O·M·N·I Window Editor manual], you must copy the files PERMWINS.DAT and STARTUP.DAT, respectively, from your \EDITOR\SYSTEM subdirectory to your \SERVER\SYSTEM subdirectory before any changes will take effect. This procedure is easily accomplished—directly from the O·M·N·I Server—by simply selecting Move Windows & Menus from the Server menu. This opens the Window Mover utility, represented by the "O·M·N·I Window Mover" dialog box, from which you may select the following options to move new windows and objects From Editor to Server . . . and instantly place them online for your users: Option Description _____________________________________________________________________________________________________________________ The Window Mover utility may also be used while the O·M·N·I Server is running. This means that you never have to shut down the Server to place new windows and objects online. 3.1.3.2 Copying Your ANSI Menus to the Server The menus you create (or modify) in the ANSI System Editor are stored, by default, under the \EDITOR\ANSI subdirectory. The menus utilized by the O·M·N·I Server are stored under the \SERVER\ANSI subdirectory. Before your Server can use any new and/or updated ANSI menus, you must first copy them from your \EDITOR\ANSI subdirectory directly to your SERVER\ANSI subdirectory. Just as described for copying your windows in the preceding section, the procedure for copying ANSI text screens is easily accomplished—directly from the O·M·N·I Server—by simply selecting Move Windows & Menus from the Server menu and launching the Window Mover utility. Simply check the Move ANSI Text Screens option to automatically place your screens online [see Section 3.1.3.1 above]. NOTE: If you have moved any new ANSI (.ANS) files to the \EDITOR\ANSI subdirectory while the O·M·N·I ANSI System Editor is running, you'll need to restart the ANSI System Editor before you may properly view them there. 3.1.3.3 Optional System Profile "Package" to Send to Users O·M·N·I gives you the option of providing your users with a single, compressed file containing all your "System Profile" information—including your system's name, phone number, sysop's name, system logo, and description [as described in Section 2.1.1 of your Configuration Utility documentation]—as well as all your permanent windows! This is extremely valuable to system administrators who may wish to pre-distribute what is essentially the first, important "windows download" that is experienced by first-time callers to their system. Because this System Profile is a single file in compressed O·M·N·I System Profile (.OSP) format, it is extremely manageable . . . and very easy to distribute. To create this file, select Create System Profile... from the Server menu. This will display the "Create System Profile" dialog, which looks like any standard Windows browser. Simply type whatever file name you want inside the File Name field (keeping the default .OSP extension) then save to any subdirectory. You will be then receive a series of prompts to enter the appropriate system name, phone number, and sysop's name before your complete system profile information is saved to file. O·M·N·I automatically compresses this information into a single .OSP file that you can distribute by whatever method you choose to your new or prospective users. The user can easily install this file—which may be located in any subdirectory on their system—by simply selecting Install System Profile... from their File menu in O·M·N·I Term! 3.2 Management One of the key benefits of the O·M·N·I Online Information System is the economy of how things are organized. Most of the internal information you need to operate your system in O·M·N·I is fully integrated, so you may access and manage many of the same database files from different areas of your system. This streamlines operation considerably and makes management a much easier job for sysops and system administrators. The O·M·N·I Server was designed to work in this way—serving as a sort of "main" control panel where you may not only monitor calls and directly engage in online activity, but also access database files and other important information that you may wish to have right at your fingertips. For instance, you may access and manage the primary statistics in your User, File, and E-mail areas directly from the Server (thereby avoiding switching completely over to your Configuration Utility) by simply selecting the corresponding area "Manager" listed under Management on the Server's main menu—or by selecting its icon on the tool bar. Each area manager, its configurability and operation, is described in detail below:
 3.2.1 User Manager The User Manager is a simple but powerful tool for selecting, sorting, or grouping multiple users by type—as well as for bringing up specific user information, editing security levels, viewing statistics for membership, checking user credits, etc. . . . While the User Database in the O·M·N·I Configuration Utility is also very useful for managing users on a selective, individual basis . . . the "User Manager" window in the O·M·N·I Server [Figure 2-E below] lets you manage your system's users in larger, ordered groups. Groups that you may sort by almost any criteria you choose—for the purpose of mailing, upgrading . . . or deleting! The User Manager is also where you may originate any e-mail messages you wish to send to either individuals or multiple recipients from the server side. (You may also reply to e-mail from the E-mail Manager [see Section 3.2.3 below].)
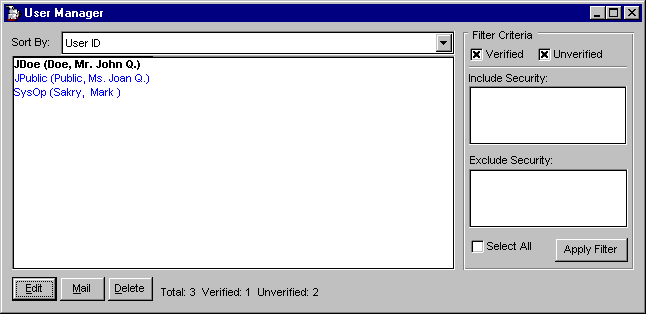 Figure 3-E The User Manager is an extremely powerful tool for viewing and editing individual user statistics, as well as for sorting multiple users into selective groups—based on virtually any criteria you choose! A full description of the User Manager's advanced functions is detailed below: 3.2.1.1 Viewing and Editing Statistics for Individual Users You may view or edit statistics for any individual user on your system—exactly the same way as you can in the "User Database" area of your O·M·N·I Configuration Utility—simply by double-clicking on the name of the user in the "User Manager" window, or by highlighting it and clicking Edit. This displays the same "User Database" dialog as in the Configuration Utility—minus its user list (if you recall, that's the left portion of the window), since you're already using the user list in your "User Manager" window. The "User Database" dialog [Figure 3-F below] also works exactly the same way as in the Configuration Utility . . . so you actually have complete access to your user database directly from the User Manager! [For a complete discussion on how to use this dialog box to view and edit user statistics, refer to Section 2.1.4—"User Database"—in O·M·N·I User's Manual #2.]
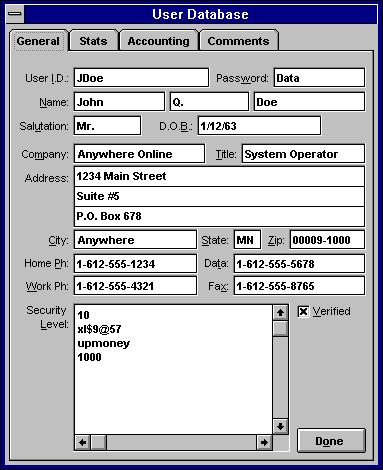 Figure 3-F The "User Database" dialog box you access from the User Manager should look familiar to you, since it is the statistical portion of the "User Database" dialog in your Configuration Utility. [Compare to Figure 2-E in O·M·N·I User's Manual #2, under "User Database."] 3.2.1.2 Originating and Sending E-mail You may compose e-mail messages to send to individuals or multiple users (that you've first selected in the "User Manager" window) by simply pressing the Mail button. This displays the "Enter a Message" dialog where you may compose your e-mail message as you would anywhere else. However . . . You must be sure to highlight all intended recipients of your message in the "User Manager" window first. If you wish to save your e-mail message, you may copy (Ctrl + Insert) and paste (Shift + Insert) it into a text file. Likewise, you may copy and paste a previously composed message from any text file into the "Enter a Message" dialog (using the same Ctrl key commands). When your e-mail message is ready to send, simply press the Send button. It will be mailed to all the recipients you selected—in a single mailing—"from" whatever name you wish to specify in the Post As field below the message entry area (automatically defaults to the last name you used). To reply to an e-mail message sent to you (e.g., Sysop), you may use the E-mail Manager—which is where you retrieve all messages sent to you by callers over your system [see Section 3.2.3—"E-mail Manager"—below]. 3.2.1.3 Sorting, Grouping, and Managing Multiple Users Perhaps the User Manager's most powerful feature is its ability to sort and "filter out" specific types of users for the purpose of grouping or categorizing them. You may find this particularly useful when you wish to send an e-mail message to a select group, upgrade security for those showing a certain level of activity on your system . . . or simply to cull your user database for certain types of users who you'd like to delete from your system. Whatever action you choose to perform, you can select all the users within a certain group . . . and deal with them all at once. In fact, only those users who fall into the special search parameters, or "filter criteria," you specify will actually be listed in the User Manager window at one time! The combinations for sorting and searching, using the User Manager, are endless. Listed below are all the devices at your disposal, and their descriptions:
Once you list users by any one of the above methods, you may selectively view or highlight specific segments of your list for various management purposes. For example, you may delete an entire segment of users who appear to be the least active callers on your system (i.e., show the fewest accumulated hours per month, when sorting by Most Active Caller This Month) . . . by first highlighting the segment you want at the bottom of your list then pressing Delete. Or you might delete under-aged callers by segmenting all the birth dates listed below a certain date, when sorting by Birthdays. You can also send an e-mail message to multiple recipients in any segment you choose by first highlighting them all in your list, then pressing Mail for composing and sending your message [as described in Section 3.2.1.2 above]. With any of the sorting methods listed above, you may extend your selectivity even further . . . by applying the various "filter criteria" defined below!
You may set search parameters to "include" only those users with specific security strings (i.e., security levels or keywords assigned to them). Or you may set parameters to "exclude" those with certain security strings (i.e., search for all users except those assigned specific security levels or keywords). You may also limit your search to either "verified" or "unverified" users (based on whatever verification criteria you happen to use)—or you may search for both. Following are the basic search tools you may use to "filter out" a segment of users from your user database and list them for your own purposes in the User Manager:
Under many circumstances, you'll be able to define a user segment using the Sort By method alone—listing all your users in such a way that you may easily scroll through your user list to find the segment you want. You may then simply select (highlight) that segment and deal with those users the way you choose. If you wish to list only a specific segment of users—for example, list only those who have lock-and-key access to, say, a special online magazine for the purpose of sending them all an e-mail announcement—you would simply enter the appropriate keyword in the Include Security field, then press Apply Filter Now. O·M·N·I will instantly search your entire list and filter out all those who have the proper matching keyword assigned to them . . . and only those filtered out will then be listed for viewing. (Likewise, if you wanted to mail a message to everyone in your user database except those who have access to the online magazine, you would enter the proper keyword in the Exclude Security field before applying the filter.) To send your e-mail message, you would then check the "Select All" box and press Mail to compose and mail your announcement. NOTE: Due to this powerful filtering feature in O·M·N·I, you may wish to put some thought into the security parameters you wish to establish before you assign "level" based and "lock-and-key" based security to your users . . . since you can also use them as search parameters in the User Manager! [Also see Section 2.1.4.3—"Specifying User Access & Security"—O·M·N·I User's Manual #2].
 3.2.2 File Area Manager The File Area Manager in the O·M·N·I Server is an advanced file area management tool which allows you to move and copy files between file areas, as well as to pull their descriptions with them. You may copy, move, and delete files (or their listings) from any file area on your system directly from the File Area Manager—without opening the Configuration Utility. You can also use the File Area Manager to import file descriptions from zip files. Following is a description of each of the File Area Manager's functions:
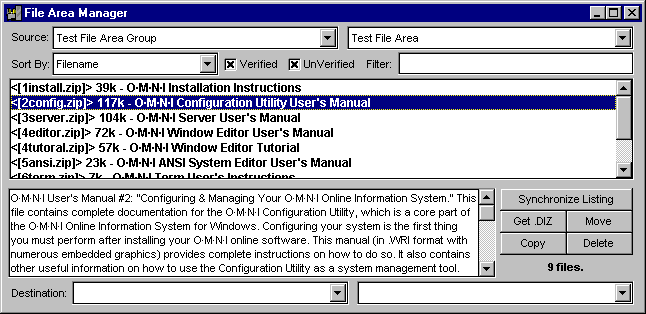 Figure 3-G 3.2.2.1 Sorting & Viewing File Listings In the File Area Manager you have a number of sorting options available for the purpose of viewing and managing files. First you must select the file area group then the actual file area from the corresponding Source fields at the top of the "File Area Manager" window. All the files in that file area will then be displayed in the list box in the middle of the window. You may then select from the Sort By drop-down menu to view your files in a number of different ways:
Filename Alphabetical order by file name File Size Biggest files (in number of bytes) listed first File Date Oldest file dates (when created) listed first Number of Downloads Files with highest # of download listed first Upload Date Oldest uploads (incl. Sysop's) listed first Download Date Oldest downloads listed first Description Alphabetical order by file title (not file name) You may also list files as either Verified or UnVerified, (depending on how they were originally specified in your Configuration Utility) by checking the appropriate boxes next to the Sort By field. To list all the files in the currently selected file area, you would check both boxes. To view the contents of a file, simply select it in your listing and right-click on it. This will automatically open the proper viewer for viewing the file . . . in the same way as when you double-click a file name in the Server's file viewing utility after selecting Open... from the Management menu [see Section 3.1.2.11 above]. In the File Area Manager, you may also view any format supported by this file viewing utility, including—.TXT, .RTF, .BMP, .CMP, .JPG, .GIF, .TGA, .PCD, .TIF, .MID, .WAV, .AVI, and .ZIP! 3.2.2.2 Deleting Files and/or File Listings In the File Area Manager, you have the option of removing any file along with its listing completely from your system or removing only the listing from your file area database but retaining the actual file on your hard drive . . . To do either, simply select (highlight) the appropriate file in the list box and press the Delete button. A dialog will instantly pop up which asks if you wish to "Delete files from disk also?" Here you have the option of deleting only the file listing . . . or both the listing and the file. Therefore, if you press Yes, you will delete both the file's record in your file area database and the actual source file on your hard drive. If you press No, you will delete only the record from your database—and the source file will remain in its appropriate subdirectory on your hard drive. At any point you may stop the procedure by pressing the Cancel button. 3.2.2.3 Copying & Moving Files From the File Area Manager, you may easily copy or move a file to another file area on your information system by simply selecting it in the list box and specifying the "destination" file group and file area in the corresponding Destination fields at the bottom of the "File Area Manager" window. Press either Copy or Move (whichever you desire) to complete the procedure. Your file area database will be changed accordingly. 3.2.2.4 Editing File Descriptions Whenever you highlight (click on) a file listed in the File Area Manager's list box, its corresponding description—as currently specified in your file area database—will instantly appear in the display field below it. You may use the File Area Manager to edit any file description on your system by simply double-clicking on a selected file in your list box. This automatically opens the "Edit File Information" dialog box (the same one used in the Configuration Utility), where you may proceed to edit your file description [as described in Section 2.1.6.4—"Viewing & Editing File Listings"—O·M·N·I User's Manual #2]. 3.2.2.5 Importing File Descriptions The File Area Manager allows you to directly import file descriptions into your file area database so that you do not have to spend time manually entering them (for instance, into your file areas' .ZIP files). The first step is to reach the "Import Descriptions" dialog box. To do this, use the Get .DIZ button in the "File Area Manager" window. The description import utility looks for file types listed in "Import Descriptions" dialog in sequence and will only import the first one it finds . . . prioritized by order of that list.
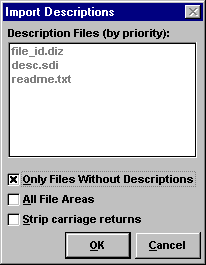 Figure 3-H Once the description import finds one of the description files, it will put the first line of description as the title of the file in O·M·N·I (and also reproduce the description file in the O·M·N·I file description). You may also select from the following options:
3.2.2.6 Synchronizing File Area Information The Synchronize File Area Information utility synchronizes the files in the current file area with the files actually in the subdirectory for the current file area. To synchronize a file area, select the Synchronize Listing button in the "File Area Manager" window . . . If files are found in the file listing but not in the subdirectory, you will be prompted to "Remove records without files?" If you select Yes, records without corresponding files will be removed. If you select No, it will ignore records without files. Cancel will abort the operation. If there are no file records in the area, a pop-up dialog will ask if you want to "Import files without records?" If you select Yes, any files in the area not recorded in the file area will be imported. If you select No, it will ignore files without records. Cancel will abort the operation. NOTE: File descriptions will not be imported with the file names. This must be done separately using the Get .DIZ function, or by manually typing in descriptions.
 3.2.3 E-mail
Manager The E-mail Manager [Figure 3-I below] is where you may manage, read, and respond to user e-mail from the O·M·N·I Server. Here you may utilize many advanced features, such as checking users' mail slots, viewing user information, reading and replying to e-mail sent to the Sysop, marking mail as read or unread, and deleting mail. 3.2.3.1 Reading Messages The E-mail Manager allows you to read all mail addressed to you (Sysop) or any of your system's users; you may also respond to any e-mail message—or delete it! To read a user's mail, highlight the user's name in the User field and select the desired mail slot from the Slot field. (If you check All—all mail to the currently selected user will be displayed.) The list of mail addressed to the user will appear in the field below by date, author, and subject. To read a piece of mail, select it in the listing. It's contents will immediately appear in the pane on the right. 3.2.3.2 Replying to Mail To reply to mail, select the Reply button in the "Mail Manager" window. This will bring up the "Quote Message?" dialog box. If you select Yes, the original e-mail message will be quoted into the text of the new message. If you select No, the "Enter a Message" window will be displayed without quoting the original. In the "Enter a Message" window, you may enter a subject in the Subject field. (If you selected Yes to quote the message, the subject will be in Re: form—which you may also edit.) You may then enter the actual body of the message in the Message Text field. You may also select the name you wish to post as.
Simply select the desired name from the Post As
drop-down list. To send the message, click on the Send
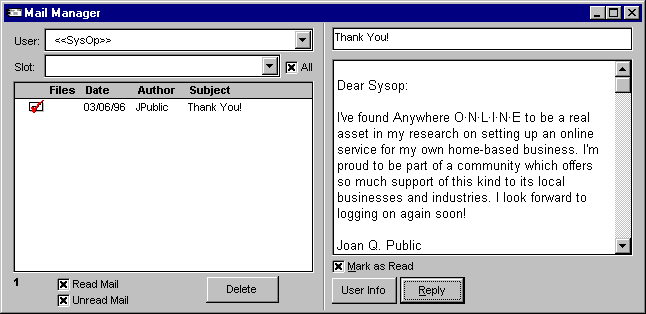 Figure 3-I The E-mail Manager allows you to read users mail as well as your own. You may also reply to any messages you read. For more selective sorting, you can also apply filters for read, unread, or all mail—as well to list the e-mail in specific mail slots. 3.2.3.3 Deleting Mail You can delete mail in a user's mail slot using the Delete button under the mail listing pane. This feature is useful for deleting already-read mail, to save valuable disk space, or to delete harassing e-mail messages. To delete an e-mail message, simply select the desired item from your mail list and press the Delete button. WARNING: You will not be prompted before deleting an e-mail message! 3.2.3.4 Marking Mail as Read/Unread If you check the Mark as Read box for a selected mail item, the Server will automatically notify the addressee that mail is waiting as soon as they go to receive their mail online. If you uncheck the box, the user will simply receive the e-mail message as being "unread" mail the next time they log on. 3.2.3.5 Applying Filters The E-mail Manager allows you to apply various filters when sorting mail. The filters you may apply include the following:
To list mail in a specific mail slot, highlight the desired slot in the Mail Slot field. If you wish to list the mail in all slots, also check the All box. You can also list read mail or unread mail (or both) in mail slots by checking these boxes, respectively [as described above]. 3.2.3.6 Accessing User Information You can display any addressee's user information at anytime by highlighting their selected mail item and pressing the User Info button under the message display area in the "Mail Manager" window. This will display the "User Database" window [as pictured in Figure 3-F above] with their complete user database information. 3.2.4 Message
Board Manager The Message Board Manager is a powerful utility that
allows you to edit messages, delete messages you do not
want your users to read, and respond to messages. Using
the "Message Base Manager" window [Figure 3-J below] you
can also apply almost any imaginable search and sorting
criteria for simple and convenient use.
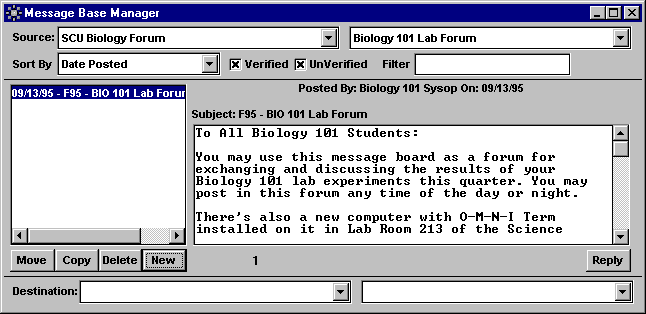 Figure 3-J The O·M·N·I Message Board Manager allows you to read, compose, delete, and reply to messages board postings. In addition, you can use selective filters for sorting—as well as move and copy messages. A full description of the Message Board Manager's advanced functions is detailed below. 3.2.4.1 Moving/Copying a Message The "Message Base Manager" window allows you to easily
move and copy messages from one message base to another. To move or copy a message, highlight the desired
message in the message listing pane then selecting a
destination using the Destination fields. The
left field is where you enter the Message Board Group
and the right 3.2.4.2 Deleting a Message Using the Message Board Manager you may delete any messages that you feel are inappropriate or that you do not wish to have displayed on your system. To delete unwanted messages, highlight the desired message name from the message list press the Delete button beneath it. The message will be deleted from your database and will no longer be displayed in the message listing. 3.2.4.3 Composing a New Message The Message Board Manager allows you to compose new messages from the Server without having to open the Configuration Utility. To add a new message, select the New button
located beneath the message listing pane. This will
display the "Posting New Message On [Message Board Group
- Message Board]" window. Enter your message subject
into the Subject 3.2.4.4 Sorting Messages You may easily sort messages by selecting from one of the three categories listed in the Sort By drop-down field. These three sorting criteria include:
To sort, simply highlight the desired filter criteria and the messages will be listed as specified. 3.2.4.5 Verified/Unverified Filter Messages will only appear in the user's message listing if they are specified as "verified." Unverified messages are hidden from users—but not from the System Administrator, if specified as such in the "Message Base Manager" window. You may list verified or unverified messages (or both) by checking the appropriate boxes accordingly. 3.2.4.6 Searching for Message Keywords or Phrases Using the Filter field, you can easily search
for keywords or phrases in a messsage's text without
going through and reading messages manually. To make use of this function, type the keyword or phrase you wish to search for into the Filter field. The filter will automatically be applied and the results will instantly appear in your message listing. 3.2.4.7 Replying to Messages The O·M·N·I Message Board Manager allows you to quickly and easily respond to messages in your message listing, without having to log on or open the Configuration Utility. To reply to any selected message, press the Reply Here you may enter (or edit) any subject in the Subject field. You may enter your actual message text by typing in the main message entry area. (You may enter up to 30,720K of text!) In the Post As field, you may enter any name you wish to post under—or select any name you may already have listed. When you're ready to post the message, just press the Post button. 3.2.5 Global Modify The Global Modify utility in your O·M·N·I Server [Figure 3-K below] is a highly configurable application that can be used to purge inactive users, old files, and read mail—or to simply compact your databases from within the Server. The results of any operation you perform will be displayed in the status field on the right side of the "Global BBS Utilities" window for viewing.
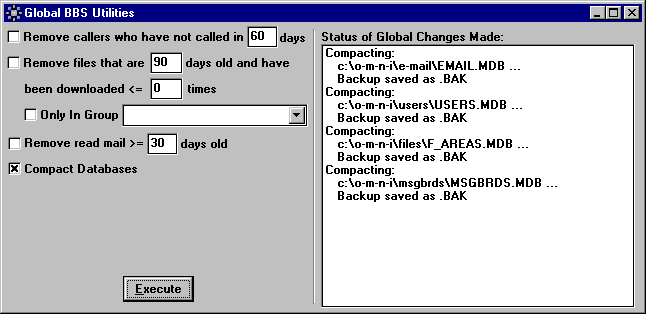 Figure 3-K Along with several useful purging operations, you can use Global Modify in lieu of the Database Compact Utility (under the Configure menu of the Configuration Utility) for condensing your E-mail, User, File Area, and Message Board databases on your system . . . and you can do it without shutting down the Server! 3.2.5.1 Removing Inactive Users You can remove inactive users by checking the box next to Remove callers who have not called in . . . days—specifying the number of days you want in the appropriate entry field (60 days is the default). When you press the Execute button, those users will be instantly deleted from your User Database. 3.2.5.2 Removing Old Files You may delete any old files using several different filter criteria. To perform this function, check the box next to Remove files that are . . . days old and have been downloaded <= . . . times—specifying the numbers you want in the appropriate entry fields (defaults are 90 days and <=0 times). If you wish to delete the old files from only a particular file group, you must mark the check box next to Only in group . . . specifying the actual group you wish to apply this filter to. If you do not check this box, all the file groups on your system will be selected by default. When you press the Execute button, the files you've specified by all the above filter criteria will be instantly deleted from your File Area database. NOTE: The "<=" symbol means less than or equal to. 3.2.5.3 Removing Read Mail You can use the Global Modify utility to instantly purge old read mail from your system. To perform this function, simply check the box next to Remove read mail >= . . . days old—specifying the number of days you want in the appropriate entry field (30 days is the default). When you press the Execute button, all read mail will be deleted from your E-mail database as specified. NOTE: The ">=" symbol means greater than or equal to. 3.2.5.4 Compacting Databases You can use Global Modify instead of the Database
Compact Utility (under the Configure
menu in the Configuration Utility) for condensing your
E-mail, User, File Area, and Message Board databases on
your system without shutting down the Server. To
perform this operation, simply check the box next to Compact
Databases 3.2.6 System Activity Data This is a simple but very useful management utility which allows you to collect and view data about how your system has been used over a specified number of days. From the "System Activity Data" window, you can instantly view such information as the number of new users, files uploaded and downloaded, e-mail messages sent, and messages posted . . . all within the time frame you choose. Simply specify the number of days in the Collect data from the last . . . days entry field, then press the Get Stats button. The data will immediately appear in the central display area of the window, listed by the appropriate categories. 3.2.7 Caller History When selected from the Management menu, the "Caller History" window is displayed, which shows all of the callers across all of your Server nodes. It is also written into the CALLERS.LOG file. 3.3 System Chat The O·M·N·I Online Information System features a complete built-in chat engine that allows any callers connected to the system to chat with one another (including support for chatting from an ANSI connection!). O·M·N·I chat also features user paging, private rooms, and whisper on both the Server and terminal sides. Chat sessions may be initiated, entered, or "invisibly" monitored by system administrators from the Server via Local Chat.
 3.3.1 Local Chat The O·M·N·I Server features an advanced Local Chat System [See Figure 3-L below] that allows you to monitor all conversations in any of your chat rooms without being seen. You can also join in, whisper to other users, view other users in whisper (available only to the sysop in Local Chat), and have notification sounds alert you of a user's arrival in a chat room. 3.3.1.1 Local Chat On or Off The Local Chat On and Off switches will put your User ID in the room list or remove it from the room list, respectively. To have your User ID added to the chat list, check On.
To remove it (and therefore remain "invisible" in the
room), check Off. 3.3.1.2 Notification Sounds Notification sounds alert you when someone has entered the chat room. When activated, this feature will automatically play a sound whenever a user arrives. To activate this feature, simply check Notification Sounds. 3.3.1.3 See Whispering When something is "whispered" in a chat room, only those whisper recipient can see what is being said. It is an "invisible" message. This feature allows you to see what is being said by anyone "whispering" in the chat room—even though the whispered conversation is still kept private from others in the room. To activate this feature, simply check See Whispering. 3.3.1.4 Whispering This feature allows you to whisper to others when you are engaged in chat. Simply highlight the user's name in the chat list and check the Whispering box in the bottom-left corner of the chat window. Anything you type to the selected user will now be seen only by that person. To stop whispering, uncheck the Whispering box. 3.3.1.5 Rooms Using the Rooms button, you may enter any chat room on your system. You may also use it to create new rooms. When you press this button, the "Select Chat Room" dialog is displayed. In this dialog are listed all the rooms presently available on your system—including sysop-created rooms, user-created public rooms, and private rooms (private rooms are chat rooms which may be kept private from other users, but not from the system administrator!). To enter any room, simply highlight it in the list and
select Join Room. You can also add
a new public room by pressing the New
Room
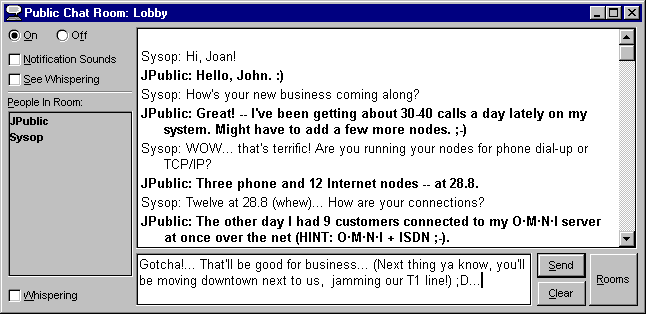 Figure 3-L In the O·M·N·I Server, Local Chat is your monitoring center for chat rooms. It allows you to be visible to your users—or remain invisible. It also allows you to monitor "whispering," add or change the chat rooms on your system, or engage in chat yourself (demonstrated above). 3.3.2 Chat Status The "Chat Status" window (accessed by selecting Chat Status from the System menu) allows you to see all the current activity on your chat system. When you select any room listed in the Rooms field on the left, you will instantly see listed on the right who is currently chatting in that room (by User ID) and the node number to which they're connected. 3.3.3 Managing Users in Chat O·M·N·I allows you to manage chat on your system through a variety of different functions. You can take users in and out of chat, send messages, page users, monitor users chatting, allow users to page you, and load new chat rooms for your users. Following are some of the many options available to you in the O·M·N·I Server: 3.3.3.1 Users Chatting At any time, you may instantly view the number of users currently chatting on your system by simply looking at the status box on the left end of your Server toolbar. When no one is chatting, the default "No users chatting" will be displayed. Here you may view the total number of users currently connected to your system, as well [also described in Section 3.1.2.3 above]. 3.3.3.2 Allow Sysop Paging Checking the Allow Page Sysop box on the Server toolbar will allow your users to page you on your system by popping up a chat window on your Server screen. If the box is not checked, users will not be allowed to page you—and they'll receive a message notifying them that you are not online, if they try. 3.3.3.3 Entering the Sysop's User ID The User ID you choose to be listed as in the O·M·N·I Server can be any "alias" you want. It may be specified by simply selecting Sysop's User ID... from the System menu and entering the name in the the pop-up dialog that appears on your screen. The name you enter is the name that will be listed in chat, as well as sysop paging. 3.3.3.4 Reload Permanent Chat Room List You can reload any permanent chat room list as specified in the Configuration Utility, without reloading the Server, simply by selecting Reload Permanent Chat Room List from the System menu. 3.3.3.5 Send System Message You may send a general message to all nodes on your system by selecting Send System Message from the System menu. This will display the "Send System Message" dialog pictured below [Figure 3-M] where you may enter any message up to 255 characters long. NOTE: Users will not be able to directly respond to your system message. If you want them to be able to respond, see Section 3.3.3.6—"Page User"—below instead.
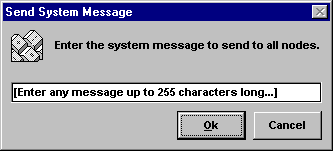 Figure 3-M 3.3.3.6 Send System Message This Node Only You can send an instant message to a user on a selected node by first highlighting the node in the "Node List" window then selecting Send System Message This Node Only from the Node menu. The "Send System Message" dialog [described above and pictured in Figure 3-M] will be displayed, where you may enter any message up to 255 characters long. 3.3.3.7 Page User This is a highly useful communications tool which functions very much like "Instant Message" in the larger commercial online services. By first highlighting the node a user is connected to in the "Node List" window then selecting Page User from the Node menu, you can use the "Page" window to initiate a private chat session with them. Simply enter your message (up to 1,024 characters long) in the entry field at the bottom of the window and press Send. Your message will instantly appear as line(s) of standard chat dialog in the main display area of the window. The user can then respond to you using the "Paging" window which instantly pops up on their screen when you first contact them in this manner! If you wish to clear all chat dialog entries in the "Page" window (on the sysop's end) at once, simply press the Clear button. 3.3.3.8 Pull User Into Chat You may pull any user connected to your system into a private or public chat area by first highlighting the node they are connected to in the "Node List" window then selecting Pull User Into Chat from the Node menu. This will force the selected user into the chat room you've specified as the default chat room on your system. This chat management function can serve as a very valuable tool for initiating group teleconferences . . . or for helping callers who may be somewhat unfamiliar with your system to find the "appropriate" chat area! 3.3.3.9 Remove User From Chat Oftentimes you may wish to remove someone from a chat
room who may not belong there—or who may not be
conducting themselves appropriately. You may remove any
user connected to your system from any chat room they
are presently using by first highlighting the node they
are connected to in the "Node List" window then
selecting Remove User From Chat
from the Node menu. This will
instantly force the selected user out of the chat room. *
|