|
O·M·N·I User's
Manual #2
Configuring & Managing Your O·M·N·I™ Online Information System
CONTENTS
 2.1 The Configuration Utility The Configuration Utility is the first place you go after you've successfully installed O·M·N·I on your central file server. (O·M·N·I gives you the option of either configuring your system immediately after installation or doing so at a later time.) This is where you start specifying the most basic options for operating your online information system . . . as well as many more advanced options which allow you to manage specific areas on your system (such as Message Boards and File Areas). You may also monitor and control certain user activity from the Configuration Utility (accumulated user credits, for instance). But other areas on your system, which allow you to access many of the same database files, may be more convenient to use in many cases. The O·M·N·I Server—which functions to some extent as a "control panel" for managing your file and message board areas, e-mail, and user information—is one example of this. You may access and configure each area of the Configuration Utility by selecting the appropriate button in the Configuration Utility window [Figure 2-A].
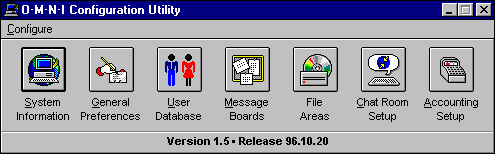 Figure 2-A Whenever you run the Configuration Utility, O·M·N·I automatically checks to see if the database for each area is up to date. If it is not, O·M·N·I prompts you with a pop-up box [similar to that pictured in Figure 2-B below] and will automatically create a new one for you—or update the existing one. You generally experience this the first time you run it, or after installing any new updates of the Configuration Utility to your system.
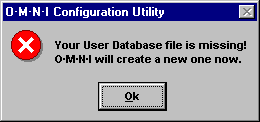 Figure 2-B IMPORTANT: Whenever you install new O·M·N·I
upgrades to your system which also include You configure and manage each area in the Configuration Utility as follows . . .
 2.1.1 System Information In the "System Information" dialog box [pictured below with default path settings], you complete information which will determine how your basic system will be set up, including its name, main directory paths, and whether it will be open or closed to new users.
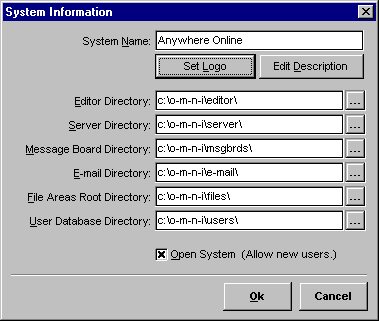 Figure 2-C 2.1.1.1 System Name The name you enter in the System Name field is the name users see on the title bar of O·M·N·I Term when they're connected to your system. You may enter any alpha-numeric name up to 255 characters long. NOTE: Title bars for individual windows on your system are specified using the Caption Text (and Title Bar) properties for the Window element in the O·M·N·I Window Editor [see Sections 4.2.1.2 and 4.2.2.1 in your Window Editor user's manual (#4) for a complete description]. 2.1.1.2 Set
Logo The Set Logo button gives you the option of having your original system logo displayed in the "O·M·N·I Sign On" window of your user's terminal whenever they select your system name from their drop-down dialing directory. You may import any graphic image (in BMP, GIF, JPG, CMP, PCX, TGA, or TIF format) of any size or color—as long as it is proportioned to fit inside the "O·M·N·I Sign On" window's 230 x 100 pixel display area. Pressing the Set Logo button displays the "System Logo" dialog box [Figure 2-D below]—where you may then press the Import button to browse and select the file you want (from the "Import System Logo" dialog box). Once selected, O·M·N·I automatically shrinks or expands the imported image to the proper size, and it immediately appears in the display panel of the "System Logo" dialog for previewing. To accept the image, simply press Done—it will then be saved as a CMP file and automatically added to your user's "O·M·N·I Sign On" window the next time they log on to your system. After that, your logo will automatically appear in their "O·M·N·I Sign On" window whenever they select your system name from their directory listing in O·M·N·I Term. It will also appear in the "System Information" dialog box, which will pop up when they click the System Info button at the bottom of the window [see Figure 2-F]. But you must first create a description as described in Section 2.1.1.3 below. NOTE: Compare Figures 2-E and 2-M . . . the latter is actually how the user's "O·M·N·I Sign On" window appears before they log on and receive the system logo from a remote O·M·N·I system.
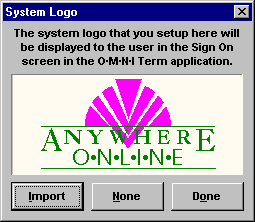 Figure 2-D Using the "System Logo" dialog box [Figure 2-D], you may import your system logo so that it appears in the "O·M·N·I Sign On" window of your user's terminal [Figure 2-E] . . . whenever they select your system name from their drop-down directory listing. O·M·N·I lets you import a graphic image of any size or color—as long as it is proportioned to fit a 230 X 100 unit area!
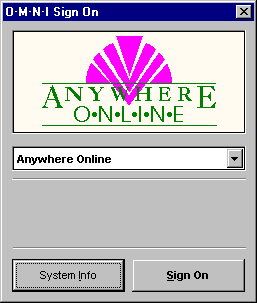 Figure 2-E 2.1.1.3 Description A user may access a full description of your online service directly from their "O·M·N·I Sign On" window by simply clicking the System Info button at the bottom of the window [see Figure 2-E above]. Both your system logo and description (as well as the Sysop's name) appear in the "System Information" dialog which pops up on their screen in O·M·N·I Term, as in the example pictured below [Figure 2-F].
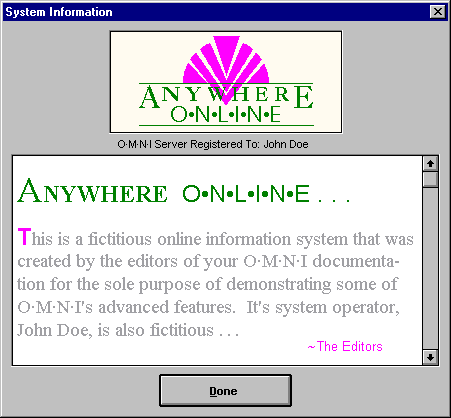 Figure 2-F When you compose a system description in the "Edit System Description Document" dialog of your O·M·N·I Configuration Utility, the window pictured above is what will pop up on your user's screen whenever they select the System Info button at the bottom of the "O·M·N·I Sign On" window in O·M·N·I Term. In this example, you see the logo and description for "Anywhere Online." To create a system description, simply press the Edit REMEMBER: If you create a document using a font that is not supported by Windows, it will automatically default to a Windows-supported font on the user's end unless they also have your font installed on their system. See your Window Editor documentation [O·M·N·I User's Manual #4] for some effective alternatives to creating design-text displays without depending on Windows system fonts. The size and proportions of this window are precisely the same as the "System Information" dialog box in O·M·N·I Term—so whatever you "compose" here is exactly what your users will see when they click the System Info button on their "O·M·N·I Sign On" window. Because your system logo and description are sent to callers (and set up in O·M·N·I Term) automatically the first time they call and log on to your system—they will have your system information available (i.e., highly visible) to them from the very start. You might consider this an optional, but highly effective, marketing tool for getting callers to sign back on to your system! 2.1.1.4 Directory Paths You must specify the path where each component program directory in your system will be found. Because O·M·N·I is designed to accommodate either large or small online information systems, you may either accept the default settings O·M·N·I has already provided or specify your own. (For example, if you're operating your system on a single computer, you may wish to keep the default settings. If you're setting up a larger system—i.e., with multiple drives—you may wish to specify others.) CAUTION: If you are an inexperienced user, it is highly recommended that you keep the O·M·N·I default settings already specified for you, until you become more familiar with the system. 2.1.1.5 Optional
Directory Lookup Buttons To the right of each directory field is a lookup button which allows you to browse and access any directory where you may have relocated a component program. This feature may be utilized only if you've already created the new location. (If you are manually entering the directory paths, be sure to make a record of them!) 2.1.1.6 Open vs Closed System You may determine whether or not you want to allow new users to log on to your online service simply by toggling the appropriate check-box in the "System Information" dialog box. By toggling it off (unchecking it), only those who already have an established User ID and Password will be allowed to log on—should anyone else try, a message will be displayed denying them access.
 2.1.2 General Preferences In this area you may specify or edit, according to your own preferences, certain dialog messages and/or text information that users are presented with when they sign on to your system. It is also where you specify the security level and starting accounting plan for new users! You may make specific entries inside any one of the tabbed sections in the "General Preferences" dialog box [Figure 2-G] as follows: 2.1.2.1 Passwords Under the Passwords tab you may edit the exact message you wish to display inside the pop-up dialog that appears on any caller's screen whenever they enter the wrong password(s).
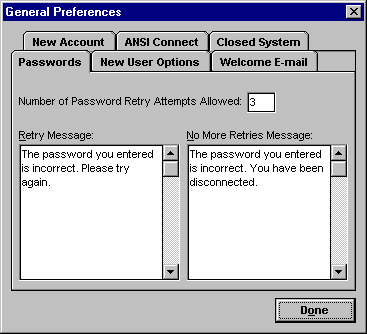 Figure 2-G The messages you specify inside the Passwords and various other tab sections of the "General Preferences" dialog box are what users will see displayed as pop-up messages online—for example, what's specified in the No More Retries Message entry field pictured above [Figure 2-G] will appear in the pop-up dialog pictured below [Figure 2-H].
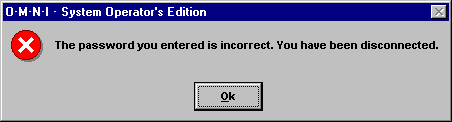 Figure 2-H The Retry Message field (under the Passwords tab) contains the text message that will appear if you want to allow callers to reenter their password—for example, those who simply make a mistake the first time. You may then set the actual Number of Password Retry Attempts Allowed . . . in the appropriate entry field. Once a caller has made the specified number of retry attempts, a dialog will pop up [as in Figure 2-H] with a message you also may specify, inside the No More Retries Message entry field. (If you do not want to allow any retry attempts, simply enter 0 (zero) as the number of retries allowed.) You also have the option of keeping the default settings already entered for you. 2.1.2.2 New User Options Here you may set your preferred Beginning Security Level for New Users . . . with either level-based or lock-and-key-based entries [see Section 2.1.3.3—"Specifying User Access & Security"—for a complete description]. You may also specify any accounting plan you've previously created in Accounting Setup as the starting Accounting Plan For New Users . . . simply by selecting it from the drop-down list under the New User Options tab. Whatever plan you select will then be the default plan that is automatically assigned to users who set up a new user account on your system. (If you do not wish to assign any accounting plan to new users, simply select "None.") As with all general preferences you enter or specify, you may edit your entries here at any time. 2.1.2.3 Welcome E-mail Under the Welcome E-mail tab, you may toggle either on or off the option to Automatically send e-mail to new users . . . if you wish, for instance, to send a welcome message to new users who sign on to your system. (It is sent only once to first-time callers.) You may edit who the message is From, what the Subject of the message is—then compose the actual e-mail message—in the spaces provided. 2.1.2.4 New Account Just as under the Passwords tab [section 2.1.2.1 above]—you may edit the pop-up dialog messages you wish to display to first-time callers in the New Account tab section of the "General Preferences" dialog box. Inside the Create Account Message field, you may edit the text message that pops up to callers who have not yet set up a new user account [as in Figure 2-J below]. Inside the Welcome Message field, you may edit the message that users will see displayed immediately after they've established a new user account [Figure 2-K]. In the User ID Unavailable Message field, you may edit the message that pops up when a user has selected a User ID that already exists on your system. You also have the option of keeping the default settings already entered for you. 2.1.2.5 ANSI Connects If you have chosen not to allow ANSI connections to your system [see Section 3.1.1.1—"Comm"—in your O·M·N·I Server documentation] . . . you may edit in the ANSI Not Allowed Message field—in the ANSI Connects tab section—the text message that will be displayed whenever someone tries to connect with ANSI. You also have the option of keeping the default settings already entered for you. 2.1.2.6 Closed System If you have specified a "closed" system [as described in Section 2.1.1.7—"Open vs Closed Systems"—above] . . . you may edit in the Closed System Message field—in the Closed System tab section—the message that is displayed on the screen of any caller who does not already have a user account established in your User Database. You also have the option of keeping the default settings already entered for you.
 2.1.3 User Database The "User Database" dialog box [Figure 2-I] lists the current users of your information system along with their account statistics and security levels. If there are no current users in your database, only an empty pane will be displayed on the left (in which case, you may temporarily enter a "John Doe" [as below] if you wish to view the entire dialog box). If you allow new users to log on to your system [see Section 2.1.1.7 above] they will be added to your User Database automatically the first time they call in. If you do not allow new users, you have the option of entering users manually. Select Add to enter any new user manually—or Remove to delete a (selected) user from your database at any time.
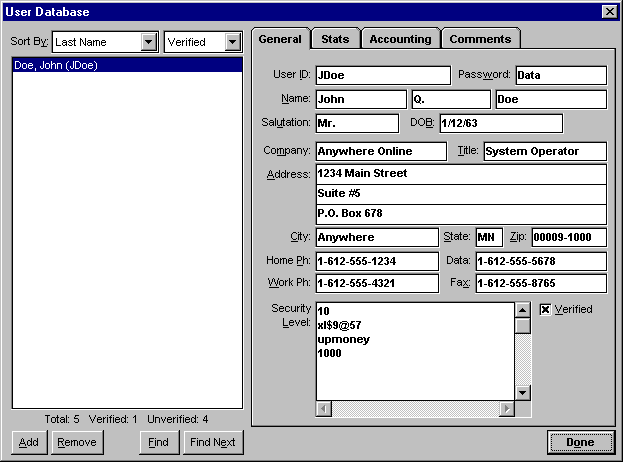 Figure 2-I If there are no current users in your database, only the left-hand portion of the "User Database" dialog will be displayed. If you wish to view the rest of the dialog box the first time you open it, you may temporarily enter a "John Doe" [as above]. In this example, arbitrary user statistics have also been added for demonstration purposes. 2.1.3.1 How
a New User Account Is Created The General tab section in the user statistics area (i.e., the right side of the dialog) shows the user account information that new users generally complete themselves using the "Create New User Account" dialog box at their own terminals. This information is automatically saved on their system the first time they enter it (for example, the first time they call an O·M·N·I system) so that they do not necessarily have to repeat the process every time they set up a new user account with a remote O·M·N·I system. Whenever a caller connects for the first time to any O·M·N·I Server (that allows new users), the "Create Account Message" is displayed on their screen (O·M·N·I Headquarters is the system being called in this example):
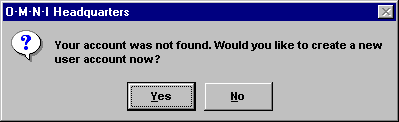 Figure 2-J When the user selects Yes . . . their user information is then automatically displayed on their screen inside the "Create New User Account" dialog box. At this point, they may make any corrections or changes to a previous entry which may be appropriate. (If no information has been entered yet, they may enter it now.) Once they select Ok the information is immediately sent to the remote O·M·N·I server and added to its User Database (the USERS.MDB file in the C:\O-M-N-I\USERS subdirectory, specifically). NOTE: If the user attempts to use a User ID that is already in use on the system, they will be prompted to "choose a different User ID." The "Welcome Message" dialog is then displayed on the
user's screen to verify their new
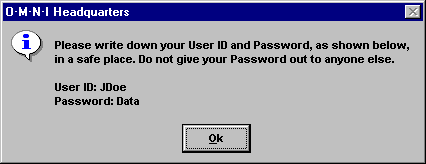 Figure 2-K As soon as they click Ok another dialog pops up asking if they would like their new User ID and Password recorded in their Dialing Directory. If they logged on to your system without having previously entered a User ID and Password into their Dialing Directory (or their O·M·N·I Term "Sign On" window)—or if the User ID they did enter was not available on your system—they can select Yes at this time to save the information to their Dialing Directory. If they select No, the information will not be recorded. However . . . If the user did previously enter their User ID and Password into their Dialing Directory (which is likely in most cases), the message may be ignored and they can select either button to proceed without making any changes to anything. [See Section 2.1.3.2—"The User ID & Password"—below for more information.] Whenever a new user sets up an account with your online service in the manner described above, their name and User ID are automatically added to the user list in your "User Database" dialog box—with their user statistics, as they've provided them, displayed under the General tab on the right. While it is extremely convenient for both the O·M·N·I Term user and the system administrator to have this "automated" procedure available . . . any user statistics in the User Database may be added, edited, or removed by you at any time. 2.1.3.2 The User ID & Password The User ID and Password are the basic identification
"strings" which allow users to call in and log on to a
remote O·M·N·I server. Users must enter a User ID and
Password for each individual O·M·N·I online system they
add to their Dialing Directory in O·M·N·I Term. They
have the option of using a different User ID and/or
Password for each O·M·N·I system listed if they wish.
They enter this
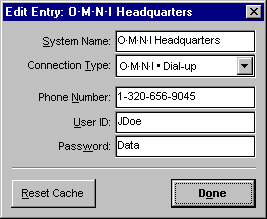 Figure 2-L If a user selects any O·M·N·I online information system listed in their directory which has not previously had a User ID and/or Password specified, they will be prompted to enter it before O·M·N·I Term will dial the number. When the system name is selected, the appropriate entry field(s) will appear automatically in the bottom panel of their "O·M·N·I Sign On" window [as in Figure 2-M below]:
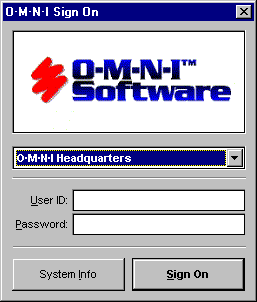 Figure 2-M This all occurs offline. O·M·N·I Term will not dial a number until the user has entered both a User ID and a Password for the selected O·M·N·I system in their directory . . . simply because it is O·M·N·I Term which must "present" this information to the remote server for user verification or for establishing a new user account [described above]. Should they attempt to log on without entering a User ID in the "Sign On" window, a message will pop up stating: "You have not entered a User ID to use. Do you want to create a new account?" If they select No, their sign on will be aborted. If they select Yes, the O·M·N·I Term will dial and sign them on to your system . . . where they will have yet another opportunity to enter a User ID and whether or not they want to record it in their Dialing Directory for future use [see Section 2.1.3.1—"How a New User Account Is Created"—above]. If—after a new user account has been established on an online service listed in the user's Dialing Directory—a caller dials the number using a different User ID than what is already in the remote server's User Database, the remote system will simply recognize them as a new caller and display the message in Figure 2-J above. (In which case, they would have to establish a separate new account.) If they attempt calling with the correct User ID but the wrong Password, the "No More Retries Message" [Figure 2-H] is displayed, and the remote server instantly hangs up after the specified number of password entry retries has been matched. Therefore, the User ID and Password displayed for each individual user listed in your User Database must correspond exactly to the ones specified for your online service in each user's own Dialing Directory . . . before their account may ever be accessed or used! NOTE: The O·M·N·I Server also checks for duplicate User IDs on the system whenever a user signs on. If the same User ID is already "logged on" when they do, it will be automatically disconnected—and the user will be allowed to log on. This allows users who may have been accidentally disconnected from the system to log back on again right away—for example, before the 90-second automatic disconnect from the Server [see "How the Term Pings the Server"—Section 3.1.1.4—in your O·M·N·I Server documentation for more details]. 2.1.3.3 Specifying User Access & Security O·M·N·I also gives the system administrator a wide range of options for limiting user access to specific areas on their system. Since the User Database of the O·M·N·I Configuration Utility is very likely the first place you will encounter security levels, the topic is covered fully here. O·M·N·I lets you assign either general or specific user access to areas using the methods described below:
2.1.3.3-A Specifying "Level" and "Lock-and-Key" Based Security Before you specify security and access parameters for individual users in your User Database, you should first establish the actual security levels, or specific keywords, you want to use for each area on your system. You specify these in the security entry fields for each area [such as in the "Message Boards" and "File Areas" dialog boxes described in Sections 2.1.4.3 and 2.1.5.3 below]. Quite simply, areas allowing general user access are specified by lower numbers than limited-access areas. Lock-and-key words are area- and user-specific. Only numeric characters between 1 and 2147483647 may be used to assign level-based security (any number higher than 2147483647 will automatically be dropped down to the maximum possible number) . Likewise, only alpha-numeric characters may be used for lock-and-key words. Entries must be on separate lines. You must enter a hard return (press Enter) after each security level or keyword entry before adding another one. The order of your level-based entries is very important: If you make more than one numeric entry, the security level will default to the first value entered in the field. NOTE: In fact, it is highly recommended that you always place a numeric security level as the first line to eliminate double entry of numeric security levels within a single user's field (which can often lead to problems)! Once the user-access hierarchy of your areas is established, you may then assign the proper security levels—and any necessary keywords—to your users. This is done by typing the appropriate character string inside the Security Level field in the General tab section of the "User Database" dialog box for each user. [See cutaway in Figure 2-N below for an example.] At any time, you may add or remove a keyword or change a user's security level by editing this field.
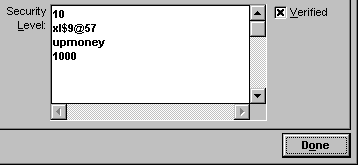 Figure 2-N John Doe has "lock-and-key" access to the specific
areas assigned the alpha-numeric strings
2.1.3.3-B Specifying Area Passwords Passwords are set in each specific area then issued to users privately. They are not assigned to users using the User Database. When specifying a password for any area on your system, you first create an alpha-numeric character string—exactly the same way as for "lock-and-key" words described above—then simply place an ampersand (&) before it. This tells O·M·N·I to pop up a query box asking for the proper password whenever someone tries to access the password-specified area. If they attempt to enter without providing it, another message will be displayed denying them access. 2.1.3.4 Sorting Users in the User Database The Whether or not you choose to exercise the Verified option, you may still list all your users at any time by selecting "All." The actual number of users in your User Database in each category is displayed below the user list field. For narrower sorting, you also have the option to Sort By . . . "User ID," "Last Name," "First Name," or "# Calls" . . . as well as user "Uploads" or "Downloads" (by number of files or size in k, listed in descending order). You may also select multiple listings at once. 2.1.3.5 Advanced User Information Other tab sections in the "User Database" dialog allow you to keep track of more advanced statistics for each user, allowing you to evaluate and control how each individual user actually utilizes your online information system. Here is where you also specify what method of accounting will be used by each user on your system. The statistics displayed under each selected tab may be edited at any time. Each tab section and its contents is described fully below:
At any time, you may reset the stats currently displayed for the selected user back to 0 (zero)—with date stats reset to blank—by simply selecting the Reset User's Statistics button. (You'll be prompted before the stats are actually reset.) Following is a description of each stat variable in this section: Files Downloaded: Total number of files downloaded to date
Because this part of the User Database is fully integrated with Accounting Setup, you may specify any standard accounting plan for the current user which you've previously created in Accounting Setup [see Section 2.1.7 below for complete instructions] by simply selecting it from the Plan drop-down field. (NOTE: If you have already specified an Accounting Plan for New Users under the New User Options tab in the "General Preferences" dialog box [see Section 2.1.2.2 above]—this will be the current plan for any new user you've selected. If you have specified the default "[None]"—this will be the current plan shown, and the Accounting tab section will appear blank.) If you wish to create an entirely new accounting plan for a selected user, you may directly access Accounting Setup by simply selecting the Accounting Setup button. This displays the "Accounting Setup" dialog where you may create the new plan as you want (i.e., as you would any other accounting plan). You may also refer to the Accounting tab section in the User Database to view various accounting statistics for a selected user. Statistics are automatically tracked and updated by the
Server and are displayed in various fields above the Accounting
Statistics display area. They may be viewed and edited
by you at any time. They include:
These statistics reflect current totals as specified by the user's accounting plan (displayed under Accounting Statistics). However, please keep in mind . . . IMPORTANT: Time-based statistics—as viewed in the User Database—are current only for that specific day, week, or month when the user last connected to your system . . . not necessarily the current one! By selecting Refresh Accounting Stats, you may instantly refresh the totals in the Value column of the Accounting Statistics listing to their original "accounting plan" specifications.
 2.1.4 Message Boards Message boards in O·M·N·I work very much the same way as on any major online interactive service, with the possible exception that users must request the creation of a new message board group from the system administrator in lieu of placing it online themselves. The "Message Boards" dialog box in the Configuration Utility is where you define what your message boards will be and exactly how user messaging will be managed. The descriptive names you enter here are strictly for your internal use and will never actually be seen on the user's terminal. However, it is strongly recommended that you organize your message boards in the Configuration Utility as closely as possible to the way they will actually be structured online. You will find that when creating menus (i.e., tree structures) for your message boards using the Window Editor, it is much easier to work with an internal message board system that somewhat resembles them. 2.1.4.1 Message Board Groups Before you can create a message board, you must first create a general topic area under which all message boards dealing with that topic are placed. This is done in the Msg. Board Groups field which is the first empty pane you see in the "Message Boards" dialog when you first open it. The message board group is your primary organizational tool. You may create as many as you wish for the efficient management of your message boards. You must "Add" a descriptive name to the entry field before you can see the rest of the dialog box. Enter any alpha-numeric description up to 50 characters long—using no punctuation. At any time, you may Add, Remove, or Name (rename) a Message Board Group by pressing the appropriate button at the bottom of this entry area. If you press Remove, a message will be displayed informing you that . . . all the message boards in this group and the messages they contain will be deleted. Press Yes only if you're sure you want to delete them. Press No if you want to cancel. 2.1.4.2 Message Boards As with Message Board Groups, the descriptive names you enter in the Message Boards field are specifically for internal organization and reference. Up to 255 Message Boards are allowed per Message Board Group and descriptions are entered exactly the same way. Similarly, you may Add, Remove, or Name a Message Board by pressing the appropriate button at the bottom of the entry area. If you press Remove, a message will be displayed informing you that . . . all messages it contains will be deleted. Press Yes if you're sure you want to delete them. Press No if you want to cancel.
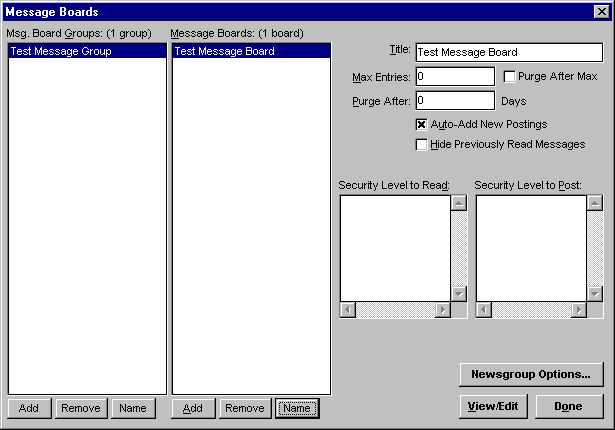 Figure 2-O You must enter a descriptive name in the Msg. Board Groups entry field before you can see the rest of the dialog box. You must also add one to the Message Boards entry field before you may View/Edit any Message Boards. You may temporarily enter "Test Message Group" and "Test Message Board" [as above] to view these areas, until you've established a practical organization scheme for your boards. 2.1.4.3 Message Board Options O·M·N·I lets you choose from a variety of options on
how each message board may be managed on your online
information system.
2.1.4.4 Viewing, Editing & Verifying Message Postings You may view and edit current postings on any selected message board by pressing the View/Edit button in the "Message Boards" dialog box. This opens the "View & Edit Message Board" dialog where a list of all current messages on the board is displayed. This appears in the pane on the left. If there are no subjects listed—you must select Add (which, incidentally, allows you to add any new message you want to the board!) and enter a new message subject before you may view the rest of the dialog box. Once your subject is listed, you may select it and enter a message in the message entry area that appears on the right. This is where the message for any selected subject appears for you to view and/or edit—and you may do so at any time. Directly above the message entry area you will see Subject, Date, and From fields which display the respective entries for the selected message. The Verified option gives you complete control over which message postings may actually appear on your system. If you checked Auto-Add New Postings in the "Message Boards" dialog box, the Verified option here automatically defaults to "checked" status, and each new posting appears on the board as it was originally composed. You still have the option, at any time, of revoking a selected message's "verified" status (thereby removing it from online viewing!) simply by toggling this option off. However, you may maintain greater control over user messaging by not enabling automatic postings—in which case the Verified option will default to "unchecked" status—and you may view and/or edit any selected message before allowing it to appear online (again, by marking Verified). If you choose, you may also Reply to a selected message, Delete it altogether, or Verify All postings listed on the current message board . . . by pressing the respective buttons. O·M·N·I also allows you to trace "previous" and "next" message threads in the subject (Messages) listing using the Previous Thread and Next Thread buttons, respectively. To further facilitate editing, you may enter or replace a message in the Message field with any existing text file by selecting the Import Text button. 2.1.4.5 Newsgroup Options... If you can connect to the Internet—using a WINSOCK.DLL-compatible connection—you can map Internet newsgroups to your message boards for access by NNTP (Network News Transfer Protocol). Selecting the Newsgroup Options... button in the "Message Boards" dialog opens the "Message Board Newsgroup Options" dialog box, where you may enter the necessary information into the NNTP Server and Newsgroup fields. [Please see Section 3.1.1.3—"Internet"—in your O·M·N·I Server documentation.]
 2.1.5 File Areas The File Area in O·M·N·I's Configuration utility works almost exactly the same way as Message Boards. In fact, the "File Areas" dialog box is nearly identical to the "Message Boards" dialog box, with a few exceptions. This is the area where you organize and manage all the files you wish to make available to callers online—including uploads. It is also where you specify the source paths to access individual files. As with Message Boards, the descriptive names you enter here are strictly for your internal use and will never actually be seen by your users. But again it is strongly recommended that you organize your file areas as closely as possible to the way they will actually be structured online. Remember . . . the files for each file area on your system must be located in their own subdirectory. Therefore, it's not a bad idea to proceed first with
creating the individual subdirectories (i.e., for each
file area) where source files will be stored. It makes
things even easier if all the actual source files are
placed there before you begin to configure your
file areas here. However, it is recommended that you
read this entire section first. 2.1.5.1 File Area Groups Before you can create a file area, you must first create a file area group under which all file areas dealing with a particular subject are placed. This is done in the File Area Groups field, which is the first empty pane you'll see in the "File Areas" dialog when you first open it. The File Area Group is an important organizational tool—comparable to a "main" directory listing under which various subdirectories may be located—and you may create as many as you wish for optimum management of your file areas. As in Message Boards, you must "Add" a descriptive name to the entry field before you can see the rest of the dialog box. Again, enter any alpha-numeric description up to 50 characters long, but do not use any punctuation. There is no limit to the number of File Area Groups you can list in the O·M·N·I Configuration Utility. At any time, you may Add, Remove, or Name (rename) a File Area Group by pressing the appropriate button at the bottom of this entry area. If you press Remove, a message will be displayed informing you that . . . all the file areas in this group and the file listings they contain will be deleted. Press Yes only if you're sure you want to delete them. Press No if you want to cancel. 2.1.5.2 File Areas The descriptive names you enter in the File Areas field work the same way as in File Area Groups. Enter any alpha-numeric description up to 50 characters long, but do not use any punctuation. You can add up to 255 File Areas per group. At any time, you may Add, Remove, or Name (rename) a File Area by pressing the appropriate button at the bottom of this entry area. If you press Remove, however, a message will be displayed informing you that . . . all the file listings it contains will be deleted. Press Yes if you're sure you want to delete everything. Press No if you want to cancel. 2.1.5.3 File Area Options Just as in Message Boards, O·M·N·I gives you a variety of options to manage each separate file area on your online information system. These options are described below:
IMPORTANT: If you ever intend to list the same file in two or more separate file areas, then these file areas (i.e., all their files) must "occupy" the same subdirectory, and you must specify exactly the same path for each one.
2.1.5.4 Viewing & Editing File Listings When you press the View/Edit
button, you open the "View & Edit File Area
Contents" dialog box. This is where you manage all the
actual source files listed for the selected file area,
whose title is displayed beneath the menu bar at the
top. Other source information, including the path to the
subdirectory where the file area actually has its source
files stored, is displayed beneath that. In the central display area are listed all the current files selected from this subdirectory which may be made available to your users online. By utilizing the Verified option [see Section 2.1.5.4-B below] you may select the specific files that you wish to appear in your file area listing online. For convenience, the drop-down menu option allows you to view files as "Verified Only," "Unverified Only," or "Both Verified & Unverified." 2.1.5.4-A Selecting, Adding & Removing Files To add a file to the central listing area for viewing and/or for editing file information, press the Add button. This will bring you to the "Add Files to File Area" dialog box. The file area's name and path are again displayed at the top. NOTE: Here it is evident why starting first with creating the individual subdirectories where source files will be located is a good idea. If you have not yet specified a path to where (at least) the files for the current file area are stored—you will need to do so before continuing. In the List of Files field are listed all the files contained in the current subdirectory. From this list you may select (by highlighting) the files that you want to work with. Here it is also worth noting that you are not obligated to actually use all the files located in the current subdirectory. You may store as many files there as you wish—and select only those that you want. You may use your Ctrl and Shift keys with your mouse in this area to select files. Press Add to copy the selected files to the Files to Add field. Press Add All to copy all the files without highlighting them. (Conversely, press Remove or Remove All to delete selected files from the Files to Add field.) When the desired "files to add" are all listed, press Ok and they will be added to the central listing area. 2.1.5.4-B Viewing & Editing File Information Each selected file in the "View & Edit File Area Contents" dialog has its own set of statistics which, when you press the Edit button, you may view and/or edit in the "Edit File Information" dialog box. The file's name and size (in kilobytes) will appear at the top. The information provided here about a file is what is made available to users online as part of its file "description." O·M·N·I gives you the option of making any or all of this information available—depending on what you specify when creating the actual window where the selected file is to be accessed by users online. This information includes:
You may also import pre-existing file
descriptions from a catalog file by selecting File
Area +
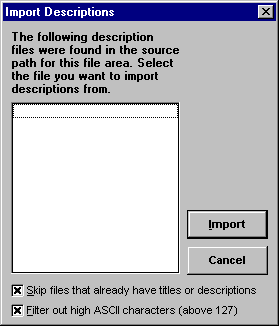 Figure 2-P Here you also have options to Skip files that already have titles or descriptions and Filter out high ASCII characters . . . for a more selective search during the importing process.
 2.1.6 Chat Room Setup O·M·N·I features a powerful built-in chat engine with full multi-node teleconferencing and chat capabilities—including user paging, private rooms, and whisper. You may have as many public and private chat rooms on your system as you want. You may specify and name each individual chat area using the "Chat Room Setup" dialog, accessed by clicking on the Chat Room Setup icon in the O·M·N·I Configuration Utility. When you first open this dialog [Figure 2-Q below] you will see that the default chat area in O·M·N·I is named "Lobby." To add another area, simply select the Add button and replace the default name "[New Room]" by typing any descriptive name up to 50 characters long into the Room Name field beneath the main chat room listing. (You will be able to see your changes as you type.) In the same manner, you may also rename any chat room (including the default name "Lobby") by first highlighting its name in your main listing and typing the new name into the Room Name field.
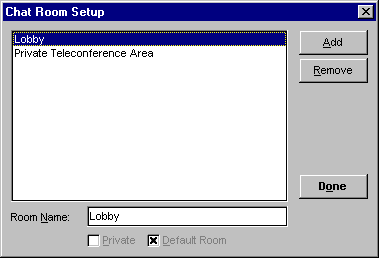 Figure 2-Q O·M·N·I allows you to have multiple public and private chat rooms on your system. In the example above, the "Lobby" is the default public chat room—and "Private Teleconference Area" has been added as a private room. If you wish to delete a chat room, simply highlight its name in your main listing and select the Remove button. (You'll be prompted before the room is actually deleted.) Whenever a caller brings up their "Chat Room List" dialog in O·M·N·I Term, only public chat rooms are listed. All new rooms you create are public rooms by default—meaning any caller can enter the room and chat with anyone else presently connected to your system. If you wish to specify a room as "private," highlight its name in your main listing and check the Private box at the bottom of the dialog. This way, a user must now know the name of the room (just like a password) before they will be allowed to enter it on your system. Likewise, you may specify any room as the default chat room (where everyone goes when they simply select "Chat" in O·M·N·I Term) . . . by highlighting it in your listing and checking the Default Room box. (The default chat room may not be specified as a private room.) You may "invisibly" monitor or directly engage in chat on your system via "Local Chat" in the O·M·N·I Server. [See Section 3.3—"System Chat"—in your O·M·N·I Server documentation for more detailed information.]
 2.1.7 Accounting Setup Your O·M·N·I Online Information System features a
fully integrated internal accounting system which allows
you to track and analyze exactly how much each user in
your User Database utilizes your online service (for
example, for billing purposes)—as well as to set user
time limits. To enter Accounting Setup, simply click on the Accounting Setup icon on the "O·M·N·I Configuration Utility" window. This will display the "Accounting Setup" dialog box [Figure 2-R] where you may proceed to create and/or edit your accounting plan(s).
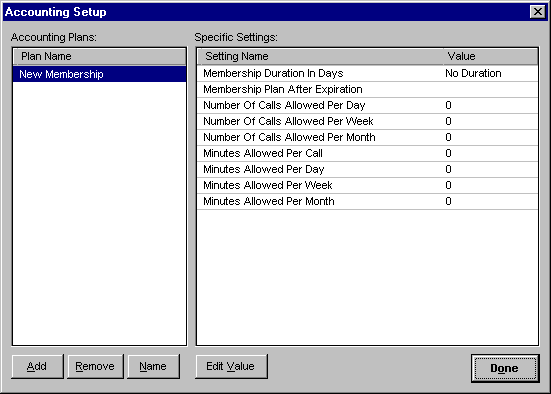 Figure 2-R By setting the value options in Accounting Setup, you can create a useful and comprehensive accounting plan for your system based on time-based management. (Default settings are displayed above.) 2.1.7.1 Creating an Accounting Plan When you first open the "Accounting Setup" dialog box, you will see an empty pane labeled Accounting Plans on the left side of the dialog. This is where you enter the Plan Name for each accounting plan you choose to create for your system. (You must add at least one plan name before you may view the rest of the dialog.) To add a plan name, simply click the Add button at the bottom of the dialog box. The "Add Accounting Plan" dialog will pop up on your screen. Here you may enter any descriptive name—up to 255 characters in length—which might reflect the specific application for which you intend to use the plan. (For example, you might name an accounting plan you wish to create exclusively for new users of your system the "New Membership" accounting plan.) Once you click the Ok button, the new name will be added to the Plan Name listing, and the Specific Settings field will instantly be displayed on the right (with default Value settings) where you may edit the appropriate settings for the current accounting plan. You may add as many accounting plans as you wish to your Plan Name listing. Similarly, you may Remove or Name (rename) an accounting plan by pressing the appropriate button at the bottom of the dialog. If you press Remove, a message will be displayed asking . . . Are you sure you want to permanently delete the currently selected accounting plan? Press Yes if you're sure you want to delete it. Press No if you want to cancel. 2.1.7.2 Specific Accounting Plan Settings & Values Once you've added a plan name, you may proceed to edit the Value settings according to the specifications you require for the current accounting plan. While it is unlikely that you will use every available setting for any single accounting plan, you may choose from the list of options in Accounting Setup to create the time-based plan you need. To edit the currently selected accounting plan, highlight the appropriate Setting Name in the Specific Settings listing and double-click it . . . or click the Edit Value button. Enter the accounting setting, or value, you want in the "Accounting" dialog that pops up and select Ok. The new setting will instantly appear in your Value listing. Repeat this for each setting required for the current accounting plan. The available time-based accounting setting options and their related values, as listed in the "Accounting Setup" dialog box, are described in detail below:
2.1.7.3 Accounting Plan Options By applying different variations of your accounting plan settings, you can customize any specific individualized plan for any established user account in your User Database�as well as create a single standard accounting plan (or several of them) for general accounting purposes. In O�M�N�I you can apply as many time-based accounting plan settings as you need. Under most circumstances, however, you'll find that only a few are actually needed to create a highly useful and comprehensive accounting plan. 2.1.7.4 Specifying an Accounting Plan You may specify an accounting plan for any user in your User Database using the Accounting tab section for the selected user in the "User Database" dialog box. [See "Accounting" under Section 2.1.3.5 above for complete instructions.] You may change a user's accounting plan at any time by either customizing their current plan or specifying a different one that you've created. Accounting Setup is completely accessible from the User Database for greater convenience and control! You may specify any accounting plan you've created . . . as the default plan that is automatically assigned to users who set up a new user account on your system . . . simply by selecting it from the Accounting Plan For New Users drop-down list under the New User Options tab of the "General Preferences" window of the Configuration Utility [described in Section 2.1.2.2 above]. 2.1.8 Configure Menu Options Any area in the O�M�N�I Configuration Utility (i.e., any area represented by an icon on the "O�M�N�I Configuration Utility" window) may also be accessed by selecting its corresponding item under the Configure menu. 2.1.8.1 Compact Databases... Also listed under the Configure
menu is Compact Databases...
which�when selected�launches the O�M�N�I Database
Compact Utility, represented by the "Compact Databases"
dialog [Figure 2-S below].
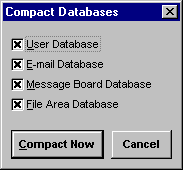 Figure 2-S It is recommended that you periodically run the O�M�N�I Database Compact Utility to remove redundant or unnecessary data from your internal database files and improve the efficiency of your system's operation. Once this utility is executed, compacting is performed automatically . . . but you must remember to first shut down ALL other O�M�N�I component programs before running it.
* |